
Hardwood Floor Installation in Central Florida: Timeline, Cost & Process
- giowoodfloors
- Feb 13
- 8 min read


If you’re planning hardwood floor installation in Central Florida, chances are you’re excited about the upgrade — and also wondering what you’re actually getting into.
How long will the project take?
Can hardwood really be installed over a concrete slab?
Will your baseboards need to be replaced?
And how disruptive is installation going to be day to day?
These are smart questions.
Most homes in Central Florida — especially in Orlando and surrounding communities — are built on concrete slab foundations. That detail matters more than many homeowners realize. Installing hardwood here isn’t just about choosing a wood species and laying planks. It requires proper evaluation, moisture testing, and professional subfloor preparation to make sure your floors perform well in Florida’s humidity.
Done correctly, hardwood flooring can last for decades. Done poorly, it can shift, gap, or warp within a year.
In this guide, we’ll walk you through the full process, realistic timelines, and the key cost factors so you know exactly what to expect before installation begins.

The Hardwood Floor Installation Process in Central Florida Homes
Hardwood floor installation isn’t a one-day project. It’s a carefully staged process designed to protect your investment and prevent long-term issues like buckling, cupping, gaps, or moisture damage.
In Central Florida, climate plays a major role in how hardwood performs. Humidity levels, concrete slab foundations, and even constant A/C cycling can cause wood to expand and contract. That’s why preparation is just as important as the installation itself — sometimes even more.
When done correctly, hardwood flooring becomes one of the most durable and valuable upgrades you can make to your home. But it starts with the right evaluation.
Step 1: In-Home Estimate & Flooring Evaluation
Every successful hardwood floor installation in Central Florida begins with a detailed, on-site evaluation.
This isn’t just someone measuring your rooms and handing you a quote. A professional installer looks at the full picture.
During your estimate, you can expect:
Accurate square footage measurements
Evaluation of your existing flooring
Inspection of subfloor condition
Moisture testing — especially critical for concrete slab foundations
Discussion of wood species, plank width, and finish options
Moisture testing is particularly important in Florida homes. Slab foundations can retain and release moisture over time, and installing hardwood without understanding those conditions can lead to costly problems later.
If you’re considering a custom finish, this is also when you’ll review staining and color matching options to ensure your new floors complement your cabinetry, trim, and overall design style.
This first step isn’t just about pricing.
It’s about identifying potential issues early, setting realistic expectations, and creating a plan that ensures your hardwood floors are installed properly from day one.

Step 2: Floor & Carpet Removal
Before new hardwood goes down, everything underneath it has to come up — and that step matters more than most homeowners realize.
Depending on your home, existing flooring may include:
Carpet and padding
Tile and mortar
Laminate or vinyl plank
Previous hardwood flooring
Each material requires a different removal approach. Tile, for example, often leaves behind hardened adhesive and uneven patches that must be ground smooth before new flooring can be installed. Old hardwood may expose nails or damaged areas underneath. Even carpet can hide moisture issues or soft spots that need attention before installation begins.
Professional floor and carpet removal ensures the surface is properly cleared and inspected before moving forward. This isn’t just demolition — it’s preparation for precision.
During this stage, installers typically:
Remove and dispose of old flooring materials
Scrape adhesives and residue
Check for subfloor damage
Identify cracks in slab foundations
Prepare the surface for leveling or moisture mitigation if needed
Dust containment measures are also used to minimize disruption inside your home. While removal is one of the noisier stages of hardwood floor installation in Central
Florida, it’s usually completed quickly and sets the foundation for everything that follows.
Rushing this step — or skipping detailed inspection — can lead to uneven boards, hollow spots, or long-term performance issues. A clean, properly prepared surface is what allows hardwood flooring to sit flat, stable, and secure.

Step 3: Subfloor Preparation & Moisture Testing
If there’s one stage that determines whether your hardwood floors last 20 years or start showing problems in two, it’s this one.
Subfloor preparation and moisture testing are absolutely critical during hardwood floor installation in Central Florida.
Most homes in the region are built on concrete slab foundations. Concrete naturally absorbs and releases moisture over time — especially in Florida’s humid climate. When hardwood is installed over a slab without proper testing and preparation, that trapped moisture can lead to cupping, warping, gaps, or adhesive failure.
Wood is a natural material. It expands and contracts with changes in temperature and humidity. The goal of professional installation is to control those variables before the first plank is ever installed.
During this stage, experienced installers will typically:
Test concrete slab moisture levels using professional-grade meters
Inspect for cracks or uneven areas in the slab
Repair damaged sections of subfloor
Apply moisture barriers when necessary
Use self-leveling and subfloor preparation techniques to create a flat, stable surface
This isn’t optional work — it’s foundational.
In fact, the National Wood Flooring Association installation standards emphasize that proper moisture evaluation and subfloor preparation are essential to long-term hardwood floor performance.
In Central Florida homes, where humidity and slab construction are the norm, this step protects your investment before installation even begins.
Skipping it might save time upfront — but it often leads to expensive corrections later.

Step 4: Hardwood Floor Installation
Once the subfloor has been properly prepared and moisture levels are verified, the actual hardwood floor installation begins.
This is the stage homeowners usually picture — but it’s only successful because of the preparation that came before it.
The installation method depends on your home’s structure, the type of hardwood selected, and whether you’re installing over a wood subfloor or a concrete slab (which is common throughout Central Florida).
Professional installers may use:
Nail-down installation, typically used over wood subfloors
Glue-down installation, often preferred for concrete slab foundations
Floating systems, commonly used with engineered hardwood
Before any boards are installed, the wood is acclimated inside your home. This allows the material to adjust to indoor humidity levels before it’s secured in place. Skipping acclimation is one of the fastest ways to create expansion or contraction problems later.
In many Central Florida homes built on concrete foundations, engineered hardwood flooring is sometimes recommended because its layered construction provides greater stability in humid environments. Solid hardwood can still be installed successfully — but only when moisture conditions are properly controlled and installation methods are carefully selected.
During installation, precise spacing and expansion gaps are intentionally built into the layout. Hardwood needs room to move naturally with seasonal humidity changes. When installed correctly, those expansion allowances are invisible — but they’re critical to long-term performance.
This stage requires precision, experience, and attention to detail. When done properly, the result is a seamless floor that feels solid underfoot and built to last.

Step 5: Staining, Finishing & Sealing
If you’ve selected unfinished hardwood, the transformation really happens during the staining and finishing stage.
This is where raw wood turns into the final look you envisioned — whether that’s a warm natural oak, a rich espresso tone, or a soft modern matte finish.
After installation, the process may include:
Custom stain application to achieve your desired color
Multiple protective seal coats for durability
Proper drying and curing time between applications
This stage requires patience. Each coat must dry completely before the next is applied, and rushing the process can affect both appearance and long-term durability. Proper ventilation during staining and sealing is important to maintain indoor comfort and air quality. The EPA indoor air quality guidelines provide recommendations for managing air quality during home improvement projects.
If you chose prefinished hardwood, this step is shorter because the boards arrive with factory-applied finishes. However, even prefinished floors require careful handling during installation to prevent scratches, dents, or edge damage.
In Central Florida homes, finish selection also matters. Some sealers offer stronger moisture resistance and better protection against humidity-related wear — which is especially important in high-traffic areas.
Depending on the products used and the size of the space, drying and curing can add a few extra days to your overall timeline. While that may feel like a delay, it’s what ensures your hardwood floors cure properly and perform beautifully for years to come.
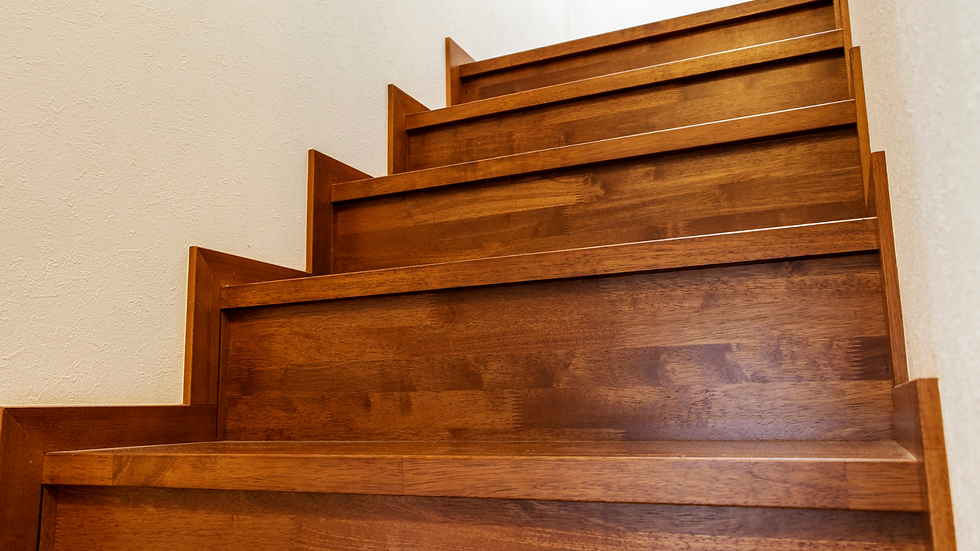
Step 6: Baseboards, Trim & Stair Integration
Hardwood installation doesn’t end when the last plank is secured.
The finishing details are what make the entire project feel complete.
Many homeowners are surprised to learn that flooring affects more than just what’s underfoot. Baseboards, trim, transitions, and stair components all need to align with the new flooring to create a cohesive result.
At this stage, projects often include:
Reinstalling or upgrading baseboards and trim work
Installing clean, seamless transitions between rooms
Matching stair treads, risers, and handrails to the new hardwood
Older baseboards may be damaged during removal, or they may no longer complement the updated flooring. In many Central Florida homes, upgrading trim at the same time enhances the overall look and ensures clean lines along walls and corners.
Staircases require even more precision. When hardwood floors meet stairs, careful coordination is essential to maintain color consistency, proper tread depth, and smooth transitions between levels.
This is where craftsmanship truly shows. When baseboards, transitions, and stair elements are properly integrated, the entire home feels intentional — not pieced together.
If you’re updating multiple rooms or levels, this step ensures everything ties together seamlessly from floor to floor.
How Long Does Hardwood Floor Installation Take?
One of the first questions homeowners ask about hardwood floor installation in Central Florida is: How long will this take?
The honest answer depends on the size of your home, the condition of the subfloor, and whether you’re installing unfinished or prefinished hardwood.
That said, here’s a realistic general timeline:
1–2 days for floor removal and subfloor preparation
2–4 days for hardwood installation
Additional time for staining, sealing, and curing if you selected unfinished wood
Smaller spaces can move faster. Larger homes — or projects involving stairs, extensive leveling, or moisture mitigation — naturally take longer.
If you’re installing hardwood over a concrete slab (which is common in Central Florida), additional preparation and moisture testing may extend the prep phase slightly. That extra time is what protects your floors long term.
A professional estimate should include a clear schedule outlining each phase of the project so you know what to expect before work begins.
Proper planning keeps surprises to a minimum and ensures your home stays functional throughout the installation process.

What Affects the Cost of Hardwood Floor Installation in Central Florida?
Cost is influenced by more than just square footage.
While the size of the space is a major factor, several other elements affect the final investment:
Type and grade of hardwood selected
Solid vs engineered hardwood
Condition of the existing subfloor
Moisture mitigation requirements
Amount of floor removal needed
Baseboard upgrades or custom trim work
Stair integration or multi-level coordination
Homes built on concrete slab foundations may require additional preparation, including moisture barriers or leveling compounds. While that can increase upfront cost, it significantly reduces the risk of future floor failure.
Higher-quality materials and proper preparation may not be the cheapest option at the start — but they are typically the most cost-effective over time.
During your estimate, a detailed breakdown should explain exactly what’s included so you can compare options clearly and confidently.
Investing in proper installation isn’t just about appearance. It’s about performance, durability, and long-term value in Florida’s climate.

Why Hiring Professional Hardwood Installers in Central Florida Matters
Florida’s climate presents unique challenges for hardwood flooring.
Humidity levels fluctuate throughout the year, most homes sit on concrete slab foundations, and constant air conditioning cycles can affect how wood expands and contracts. These factors may not be visible day to day, but they significantly impact long-term floor performance.
Experienced hardwood installers understand how to manage moisture properly, select the right installation method, and follow manufacturer guidelines to protect both the flooring and its warranty.
Working with qualified professionals reduces the risk of:
Buckling floors
Cupping or warping
Adhesive failure
Gaps between boards
When hardwood is installed correctly — with proper preparation, spacing, and finishing — it can last for decades and add measurable value to your home.
Schedule Your Hardwood Floor Installation Estimate in Central Florida
If you’re planning hardwood floor installation in Central Florida, the smartest next step is a thorough, professional evaluation.
From removal and subfloor preparation to installation, staining, and finishing details, every phase plays a role in how your floors perform over time. A detailed estimate provides clarity on timeline, cost, and the specific requirements of your home.
If you’re ready to explore your options, schedule a free in-home estimate and get expert guidance tailored to your space.


Comments